
How To Fix SmartGaga Blue Screen on Windows 10 / 7 100% Work
SmartGaga Blue Screen
SmartGaga is an Android emulator that is very lightweight, it can even run on low-end PCs very smoothly. With SmartGaga we can run our favorite android games like PUBG Mobile, Free Fire, Mobile Legends and other android games.
SmartGaga is a favorite Android emulator for Android game lovers on PC. This is because SmartGaga is so lightweight that it can run on PCs with low specs. In addition, compatibility with the latest games is also very high so that almost all new games can run smoothly on SmartGaga.
Although SmartGaga is a favorite for Android game lovers on PC, the SmartGaga (Titan Project) project is stopped by its developers. According to the issue, the developer is now participating in the development of another android emulator project called GameLoop. SmartGaga is now discontinued and stopped on version SmartGaga 1.1.646.1 (available on Android 4 and android 7).


SmartGaga Blue Screen Error
Starting from a while ago SmartGaga often caused Blue Screen on Windows 10 or Windows 7 when we were playing games, especially when we played Free Fire. SmartGaga Blue Screen is caused by its incompatible Google Play Service and Google Play store which has been installed on SmartGaga.
Many SmartGaga users complain about this because the solution has not been found. They even switch to other android emulators such as LD Player, NOX App Player, or Bluestacks. We cannot rely on the SmartGaga developer to fix these bugs, because as we explained above the Titan Project developer has left SmartGaga. All we can do is tinker with SmartGaga ourselves.
SmartGaga Blue Screen Fix
As explained above, the SmartGaga problem because of the Google Play Store and Google Play Services, we have to manually update it. But keep in mind to install it manually is not easy. We can not directly update it by installing a new version. If we do that we will find the application error message is not installed. To be able to update manually follow the following steps carefully.
Method 1: Manual update Google Play Services & Google Play Store
- Download Google Play Services 20.18.75
- Download Google Play Store 21.1.29
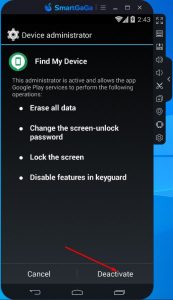
- Deactivate Device Administrators.
- Open Settings
- Select Security
- Select Device Administrators
- Untick Find My Device
-

- Back to Settings
- Uninstall Google Play Services Updates
- Select Apps
- Select All Apps
- Select Google Play Services
- Select Manage Space
- Select Clear All Data
- Back to Settings
- Uninstall Google Play Store Updates
- Select Apps
- Select All Apps
- Select Google Play Store
- Select Manage Space
- Select Clear All Data
- Install Google Play Services by drag and drop the Google Play Services APK that we’ve downloaded before
- Wait until Google Play Services installed on SmartGaga.
- Install Google Play Store by drag and drop the Google Play Store APK that we’ve downloaded before
- Restart SmartGaga and your ready to play any game you like on SmartGaga No need to worry about experiencing Blue Screen again.


Video version of this tutorial

Method 2: Update SmartGaga Nougat Version
- Download SmartGaga 1.1.646.1 Nougat Version.
- You can keep the SmartGaga KitKat Version or you can uninstall it. But my advice is that you keep it if at any time you need a KitKat version of SmartGaga.
- Install the downloaded SmartGaga 1.1.646.1 Nougat Version. Make sure you install in the same location as the SmartGaga KitKat version if you choose not to uninstall it.
- After the installation process is complete run SmartGaga.
- Open SmartGaga Settings (the gear icon on the right panel of SmartGaga)
- Select the Basic menu
- On the Android Drop Down Menu Select Android 7.1.2
- Save settings by tapping the Save Button on the bottom of the menu
- Reboot SmartGaga.
- Now you have SmartGaga Nougat version. You can always change the Android version anytime just by repeating from steps 5.
Configuring Play Store
As we know, if SmartGaga often has problems with Google Services (Google Play Store) which can cause Blue Screen on Windows 10 or Windows 7 then we need to configure the Google Play Store after the SmartGaga Nougat version installation is complete. Follow the steps below to configure Play Store to prevent the automatic update.
- Open Google Play Store
- Log in with your Google account
- Tap burger icon on the top-left (three stipe icon)
- Select Settings
- Select App download preference, set to Ask me every time
- Select Auto-update apps, set to Don’t auto-update apps
- Done